Midnite Classic Review
With PV so cheap, batterys are now the weak link in off grid systems. The critical task of taking care of our expensive lead (and lithium) banks falls to the charge controller 1. We require in a CC that challenging combination of a comprehensive feature set and yet 100% robustness. This review documents three years experience using a Midnite Solar Classic 150 Lite Charge Controller.
Deciding factors
For our new small house installation, what we were also looking for was reasonable cost, and a high level of monitoring. Midnite Solar is a small company that is the ultimate conclusion of a long line of venerable RE companies 2. With Trace, Xantrex and Outback all having been swallowed up by larger parent companies, when it comes to things like R&D, and customer support, Midnite now occupies a strong niche position in the RE manufacturing world.
For us, it was the little things, like high Voc tolerance, 96 amp capacity for upgrades, things like field updateable firmware, in-built ethernet logging, and cutting edge features like arc and ground fault protection, and their awsome battery monitor accessory. The biggest range of auxilary port functionality on the market, allows you to make the most of surplus power. Stacking multiple controllers is easy with "follow me". For more or less a single piece of hardware you get everything you need.
Then, when the quality and feature boxes are all ticked, what it boils down to is cost. The reality is that to do the equivalent using Outback gear, we would have needed a mate3 ($430), flexnet dc ($275), and hub ($140), for a total of $1410. Compared to the Classic and battery monitor: $669. With the option to save another $110 by using the lite version of the controller, the evaluation wasnt really that difficult.
The one main down side, is that using Outback, or Schneider gear, for the price, you get a whole ecosystem that talks with their respective lines of inverters. For us that wasnt an issue. 3
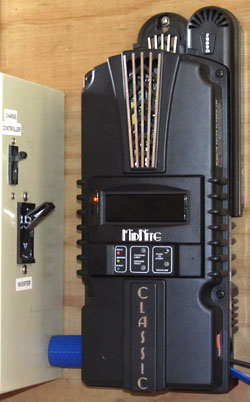
So there we were, not knowing about Midnite, shopping for a Flexmax, which are common around these parts. I remember the first time that I set eyes on a Classic, I actually dismissed it as 'American'. To be honest i was put off by the Classic's case styling. A fan of clean lines, and large aluminium extrusions, it was a good thing I managed to get over the Classic's black alloy cast case, and curvy retro styling.
Discovering to my surprise that NZ did indeed have a distributor, research then showed that the Classic was well regarded, approaching cult status in the US. Looking under the skin, I found a remarkable piece of hardware, made by a remarkable company. Ordering one from the local distributer, it cost twice what Americans pay, but anything from the US costs more here. As its serial number was under 5000, it was also clear that I was now part of a small but hard core group of enthusiasts (remarkably since that time they have sold 20000 of these things).
Installation
Unpacking it, the controller was smaller than expected, given that the thing handles 4 kilowatts of PV. There are three mounting screws, two in the base, and one in the plastic top decoration. Looking at it, it appeared that the plastic turbo fan was added on as an after thought, probably to get that 96A best-in-class rating.
Wiring it up was easy enough, my nit picks center around the one piece lid. The control board is vulnerable when the case is opened, which is required when working on it. For example to attach the usb cable to upgrade the firmware. The lesson there is to attach all the coms cables at the beginning. But, you should also be very careful during installation. Leave the lid attached until its mounted. Treat the insides like the inside of a computer. Power it off when working on it, and be careful not to drop screws, or other small metallic items.
To refit the llid, there is a blue coms cable that has to be carefully clipped and seated. This is a bit tricky in a dimly lit shed, but is kind of unavoidable given the modular nature of the displays. Take care not to pinch the top fan cable.
Also, the power and coms connectors are mounted on the power board edge, with little physical reinforcement. This means that when fixing the 16mm2 power wires and youre trying to torque the screws up, you are flexing the circuit board. On balance I would prefer a stud and lug solution.
Lastly, the status leds are slightly recessed, making them not visible from the controllers right side. The key to the leds looks like leds, similar to the GFP/EQ leds, which is a bit confusing at first.
Anyway I wired it up with the power cables through the left vent, and the coms cables through the right vent. Given that it is an electromagnetically noisy environment, anything you can do to create com cable separation is good.
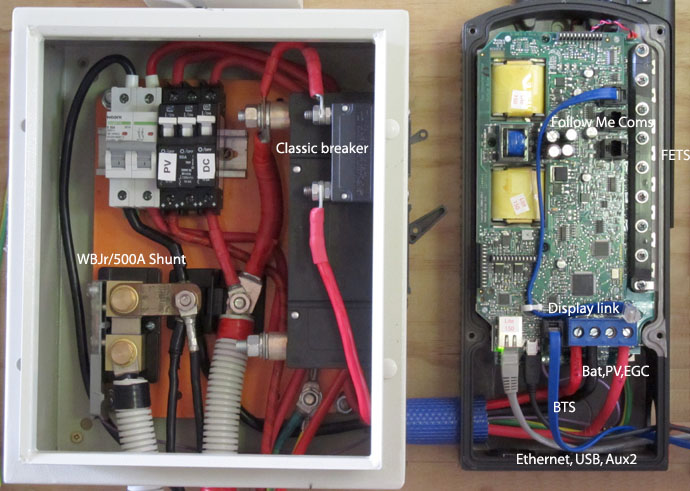
Connecting the power cables requires a pair of pliers to prebend the cables so as not to place undue pressure on the circuit board. 16mm2 and 25mm2 stranded cables will fit into the terminals. You only need to wire one of the two negative wires to the disconect's negative bus. This works well, just fitting the three 16mm2 cables plus EGC through one vent port. The manual says 6mm2 for earth is enough for 60A, but the terminal will fit up to 4awg.
You have to make a decision whether to use the built in ground fault interupter (GFP). Even though its a common code requirement, it ships disabled and Midnite have waded into what is a hot topic by saying that you are better off without it 4. If used you fit the jumper lower right on the motherboard (and you must also enable it in firmware, and remove any ground to current carrying conductor bond).
I should mention here that, while shopping for your first charge controller, it isnt all that clear what the power ratings actually mean. While Midnite has a good string configuration tool on their website, its useful to understand that the power rating relates to output current amps, not input watts. So the higher your battery voltage, the more power it will handle. Its also not that critical that you keep your input power under the output limit. The controller will ignore or current limit what it cant use. Few off grid installations run at full rate capacity for any amount of time.
Setup for the full Classic is easy with the MNGP. With the Lite you have two choices for the setup, configure the dip switches on the rear of the MNDP display, or connect a laptop via ethernet and configure using the downloaded (Windows) 'Local Application'. With the Lite the Local App is a fact of life, so you can either use the dipswitches to intially set the battery type and voltage and the IP address, then later set the dip switches to custom. Or you can, from the get go, set the dipswitches to custom, and go Local App from the start.
The Classic will take an DHCP IP address from your LAN router, and the local app will automatically scan for and find the classic. However for long term IP address stability its best to then change the classic to static IP mode.
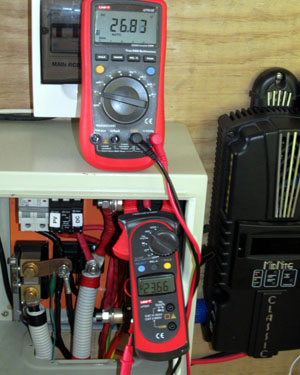
Medium load efficiency test setup
The purpose of the local app is two fold, to both configure and access reporting. Its not the best piece of software in the world but it works. I'll deal with the local app in more detail later.
So, here we comissioned using the first method, dip switches to 24v, AGM, and static 192.168.0.223. After, double checking all the wiring, and booting it up, all the LEDs light and both fans test spin up briefly, then drops into standby mode. Engage PV, goes into bulk, and we are in production.
Performance
Of interest here is noise, operating efficiency, and tare loss.
The device has three fans, two in the lower case which are set to run when the FET temp gets somewhere over 45 Celcius. The third, 'turbo' fan doesn't come on at all here, it's only needed in hotter climates, or when running at max load. Some other controllers don't have fans and that's a route I usually prefer if possible. It's one less moving part, one less fail point, and it's not like space is at a premium.
The Morningstar and Schneider controllers are both fanless, and anecdotal reports are that they run cooler. Thermal issues arent a big problem here as the controller is in a shed with air temps about 15 degrees C and the second fan has never run even at 1800W, and the first fan runs intermittently for maybe a half hour each sunny day, later in bulk.
The Classic is generally suprisingly warm to the touch though, even when seemingly doing nothing. You can see why when you do a rudimentary efficiency test, at a low-to-mid range operating power. Here three samples were taken about one minute apart, then averaged [5a].
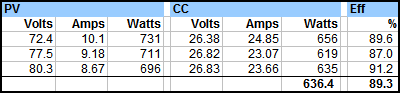
This isnt lab grade efficiency testing by any means, but it does show I believe, how a controller that is 90% efficient has to dissipate 75 watts even when running at 640 watts 5.
And while we are at it lets check the accuracy of the controllers voltage and current data for these samples.
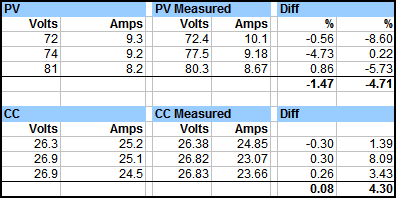
Not having 4 identical calibrated meters 6, therell be some measurement errors in there, but as a guide the voltage readings are pretty tight, and the current readings are not too far off the range of the clampmeters accuracy.
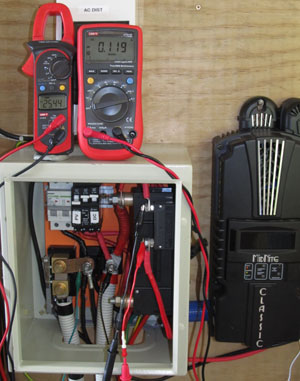
Tare power test setup
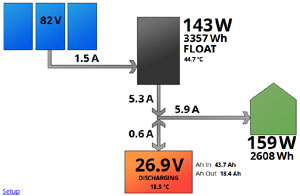
One last test we will do is standby current draw. For the lite that clocks in at 3.01W +/-0.5%. Thats in full standby/sleep mode. If you shut down the PV and measure the no source draw prior to the standby transition, its drawing more like 15.1W 7.
That tare load amounts to ~170Wh/day, and by implication the threshold at which the tare loss alone consumes more than 10% of daily production is for systems under 1kW 8. So for smaller systems you are looking at another controller (try the Kid).
Lastly this section would not be complete without a comment on reliability. For better or worse computers are creeping into all facets of our life, and the classic contains 3 CPUs 9. Most of us have probably owned an internet modem that crashed regularly, and I recently rescued an elderly couple on the roadside when their brand new Volvo's car computer crashed.
You and I would rightly consider our RE systems mission critical. Hence, I am glad to report that there have been no issues at all here in 12 months. The controller uses a watchdog system, where a seperate system monitors the stability of the main processor, and if need be reinitilises it. Hence the controllers runs 24/7 without fail.
Software
It's one of the defining features of the midnite classic that you can plug ethernet straight into the controller. They provide software that works over ethernet that runs on Windows, Mac and Linux partially. This means that all you have to do is wire a RJ45 patch lead into your home network router and you can access the classic from any computer on your network. With port forwarding you can even open this up to the wider internet. In general it works well, with some caveats.
Firstly in order to avoid the processing overheads of an in built webserver, they used an obscure framework called Adobe Air. Air basically allows developers to create desktop applications using web software technologys but which run on the client computer. So you first have to install Adobe Air, then the local application itself. There are two problems with this. First Air is fairly resource intensive stemming from its Adobe Flash roots. Second, cross platform support for Air was never broad and appears to be on the decline.
Back in 2012 when the software was still new and under development I did have some problems with the local app. It's easy to buy a product thinking that its in a stable, factory programmed condition, install it, and then get on with building the system, house, farm whatever. However, its important to understand that the classic firmware is under continuous development. You might buy something thats been in the warehouse for a few months, sat in your things to do pile a while longer, and by the time you install it the software is 6 or more months old.
So its likely that during that time new firmware and local app versions have been released. So, after the controller tests ok, get the latest firmware, and the latest Local App, at the outset. I know that there's often a reluctance to mess with the software of a brand new device, but if you follow the excellent instructions, it seems fool proof enough. Like any firmware, its good to work calmly, with an unplugged laptop with a full battery, be sure of the steps and allow them to complete fully. Edit: the Win8 instructions are now horendously complex, and a brand new firmware updater is being developed for Win10.
Firmware updates are done using a serial to usb cable, same as you'd use for your camera or phone. In most instances you want the latest stable version, although there is also an active beta testers program.
After upgrading my original firmware from 1070 to 1370, the Local App worked good as gold. Over the years, several new features were added, for instance 1609 brought support for the Whizbang Jr. battery current sensor, and the new 'days between bulk' feature. The latest firmware as of Dec 2015 is 2079, which happily, brings us the rock solid network stack that the classic deserves.
The real strength of the Local App is the ability to completely configure the classic from your desktop. Once you figure out that you have to enter your serial number to unlock the otherwise hidden config screens, you can fine tune the setup using several pages of settings. Absorbtion and float voltages, temperature compensation, ending amps, intervals, aux modes etc etc.
I will say something about absorb time here, because its a potential tangle for the uninitiated. The current paradigm (1370+) is: you set an 'absorb time'. This is the maximum time that absorb will run for. If you set ending amps as well (non zero amount, tucked away on the third screen), Ending Amps triggers an early transition to float if the target current is reached before the max time. With the highly recomended Whizbang Jr., you can choose to use the Whizbang current rather than the controller output current, and this is the holy grail of absorb termination, the perfect system which we had all been waiting for. If you don't use a Whizbang (or Outback's equivilent FlexnetDC) the controller can't tell battery current apart from load current, and absorb will be terminated too early or too late.
One gotcha to watch out for is that firmwares prior to 1370 had a different absorb regime, a system involving min and max times and an interval proportional to bulk time. As this is now considered sub-optimum, if you come across an old controller, this is a good reason to upgrade.
Note that the Local App and the MNGP are laid out rather differently, however they are now more or less feature compatible which is good to see. Another interesting thing is that the front display panels are modular, and run off the classics modbus network. This means that you plug a MNGP into a lite and it will work; plug a MNGP into a series of followme controllers and be able to read all the classics off one display; and you extend the (telephone style) cable to remotely mount the display.
Monitoring
In terms of logging capability the local app shows real time data, voltage current, watts today, etc on cool looking retro style gauges. It also allows you to chart those datapoints for the duration that the local app is running. Thirdly, the classic stores 380 days of daily data summaries, and you can export these to an excel spreadsheet in one click.
As if that wasn't enough, there is also MyMidnite. MyMidnite works by the Classic calling the Midnite server every 15 minutes and uploading stats, which you can login to access securely, and view nice graphs. MyMidnite is easy to use, makes your data available anywhere in the world, but is of necessity limited by the 15min sample rate, and 3 week fine grained data lifetime.
Lastly using the open modbus specification and the ethernet or usb port you can roll your own monitoring solutions. It really doesn't get any better than that in terms of options. The use of the modbus over ethernet protocol, opens up the potential for people to interact with the classic in diverse ways. People are writing android apps, web apps, bash scripts you name it, to both read and write to the classic.
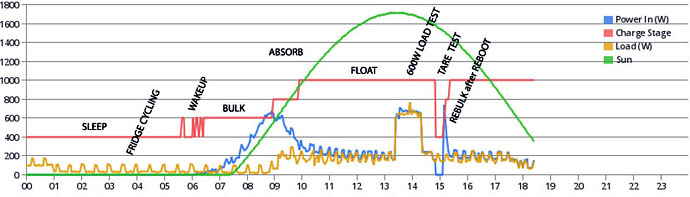
Here is some screens from the blackbox project, showing data for the test system above.
All firmwares previous to 2074 had a weakness is the ethernet stack. This issue manifested in various areas at various times, local app, mymidnite, and custom logging applications. The symptoms were dropped connections, spontaneous reboots, and ethernet stack lockouts. Should you encounter this, the controller continues to operate normally, but a controller reboot is required to bring the ethernet side of right again. I am pleased to report that with firmware 2074 onwards this issue is now resolved, and, ethernet connections are completely stable.
Support
There is an extensive manual, but note that like many a highly active project, the manual is sometimes a little behind the new features. Maybe they should set up a wiki where we can pool what we know, take some of the pressure off Midnite so that they can get on with releasing their highly awaited new products.
But when it comes to support, the forum, email, and phone support is probably second to none. The guys that build and program the hardware frequent the forums, and are happy to hear about feedback and ideas.
Conclusion
Compared to the $100 PWM controllers of old, MPPT charge controllers are expensive, theres no doubt about that. However given that Midnite has avoided the lure of offshore manufacturing, given the top quality and the ongoing product innovation, really the cost is really quite reasonable, and the product is, on balance, highly recomended.
Version 1.0, Circa 2013.
Version 1.2, typos, grammer, and minor changes.
Version 1.3, Dec 2015, firmware fixed, new intro.
Notes
1 The exception is AC coupling, where grid tie inverters are paired with the off grid inverter to source power via the AC in, instead of DC. The best application for AC coupling is for large multi array installations where considerable distance exists between components. However as a result of the coordination required between the inverters, at the moment, ac coupling is a much more expensive solution.
2 http://hardysolar.com/inverter/inverter-history.html
3 Midnite are working on their own inverters.
4 http://midniteforum.com/index.php?topic=142.0
[5a] Given the use of clamp meters this limits the usefulness of this rough test. However Midnite do not publish efficiency curves.
5 Another implication from this is that perhaps we shouldnt stress about a few percent cable loss, when we are dealing with 10% controller loss.
6 voltage:0.1%, 10A current:0.5%, 40A current:2% UT61E, UT203
7 From what i have heard the full version has a higher tare draw again due to the load from the MNGP graphic display and arc fault detector.
8 Assumes 1.7 kWh/kWp.
9 http://midnitesolar.com/pdfs/classicManual.pdf
2015-12-24
www.zoneblue.nz/cms/page.php?view=midnite-classic-review


