Fisher and Paykel Washing Machines
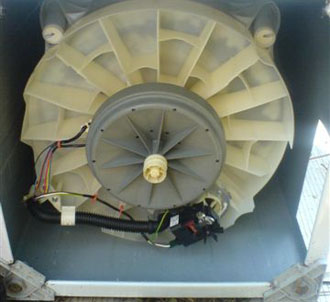
Not much underneath: permanent magnet motor, and water pump.
Older New Zealanders grew up somewhat removed from world markets and cheaper overseas goods, so things like cars, electronics and whiteware were always expensive. This lead us to becoming famously a nation of DIYers and with a mindset where "good old number 8 wire" can fix just about anything. And even with today's more open markets, and all this cheap chinese stuff, that mentality tends to live on. Hence we hang on to our old washing machines longer than we might.
In the whiteware department that environment produced the innovative company that is fisher and paykel, and it was they who invented the direct drive washing machine in 1991 and later the dish drawer dish washer. And they went on to export "smart drive" technology around the world. (As a side, renewable energy, note these washers use only 100Wh per wash and can run on sub 1kW inverters.)
Below are some notes on keeping these washers (particularly 1991-2001) alive. These are all top loaders, Phases 1-5, with model numbers beginning GW, MW, LW, and AW. The first number is generally 5,6, or 7 for the 5kg,6kg, or 7kg respectively. A comprehensive service manual for this series is available right here: www.zoneblue.org/docs/Fisher-and-Paykel-Service-Manual-1991-2001.pdf.
That we are only really repairing these at the 10, even 20 year mark is evidence enough that these machines are pretty robust. With no gearboxes, belts, and pulleys, theres not a whole lot to go wrong, and at the same time assembly and disassembly is a piece of cake, theres hardly anything inside them. And while the design continues to be refined, even the latest machines follow the same essential mechanical layout, and share many common parts from the earliest machines. This makes finding parts cheap and easy. But one word of advice, dont let problems get out of hand, it can make fixing them more involved. Unusual noise, puddles on the floor, any beep sequences, should all be attended to sooner rather than later.
Water valves
Every machine ive owned has had at least one of these inlet solenoids fail. The basic symptom is that the drum either wont fill, or fills exceptionally slowly. They are easy to replace (under the top deck), and you should start a collection of them from any junk machines you come across. The earlier ones are mostly the same 12V 15 ohm, but the phase 5 units onwards have 24V ones. The hot and cold are usually different except phase 1, where both are standard, rather than the cold being proportional.
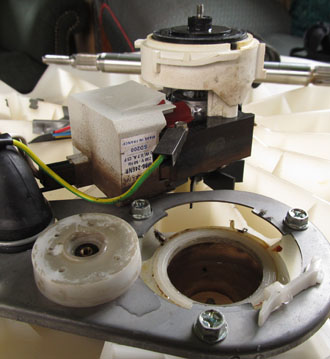
The impeller unscrews! Gently pry seal to clean.
Water Pump
The water drain out pump is probably the main weakness. Its attached to the bottom of the outer drum, and as it is used as part of the power supply to the machine, critical that works correctly. The pump inlet can get blocked by small items or debris that inadvertantly escapes the inner drum, the pump seal can get wound with hair and debris, causing it to either leak, or prevent the pump from starting. Considering that the pump is so easy to remove, inspect and clean, i suggest you make this a regular maintenance task. Water entering the pump may lead to complete failure of the computer control board.
Topside: after removing the top deck, and outer drum cap, remove the fabric softener cap, reach down and undo the big plastic wing nut, and this allows you to remove the inner drum, and thus clean out around the pump intake area.
Underneath: Most models have an inspection hatch on the lower right front surface of the case for this purpose. Unclick the white plastic pump locking tab, and the whole pump drops out for cleaning. Inspect for leaks, seal integrity, corosion or pitting on the shaft. Remove the seal, clean and refit with a rubber friendly grease.
Main bearings and lip seal
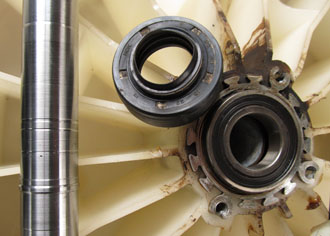
Brown staining shows a leaking main seal.
If the unit concerned has had a hard life, (when buying, look for those owned by grandmas not family of fives), the pump seal will at some point start leaking. This triggers a nasty cascade failure sequence, where the water, soap and dirt in between the seal and the shaft wear and pit the shaft, accelerating the leak to the point where the bearings dry out, corode, and fail. Catching this before that happens is the key. ANY kind of new sound on the spin cycle, and youve likely left it too late. As the bearings, lipseal and shaft are the most valuable and time consuming item to replace on these machines, early attention here is worth it.
The procedure is pretty much a full strip down of the machine, and well enough explained in the manual. You can remove the shaft nut with a monkey wrench and some scrap wood to hold the spline with. Before removing the shaft, wrap both splines with duct tape to protect the seal. Knock the lower bearing out from the inside using a piece of pipe and hammer, working your way around in small increments. Then repeat for the inner bearing. Note that removing the lipseal the way the manual mentions will destroy the seal. While letting the inner bearing force it out when you remove the bearing, will pop it out intact, seal replacement is almost certainly required as that is the cause of the bearing failures. Service people ive spoken to have confimed that gritty water causes rapid accelerating shaft wear and failure of the seal, and also that the older shafts lasted longer.
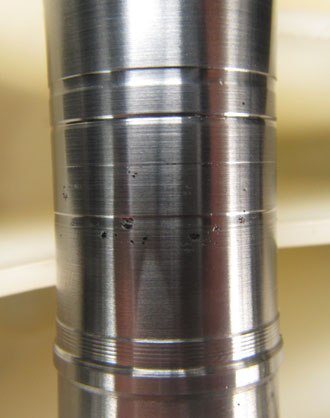
Both pitting and shaft wear in seal area.
The only grooves that belong are in the lower third.
Once the shaft is removed, give it a good clean with scotchbrite and inspect for wear and pitting, particularly in the lip seal area. If its worn, then youll be looking for a new shaft, again, your best bet is the scrap merchants. As the machines either fail from use (mainbearings and seals), or misadventure (control boards), your chance of finding one with a ok shaft is good. New, the shafts are 140 dollars, and you might be better off with a brand new machine for $699 rather than going down that route. The bearing and seals are readily availble as a kit from trademe or ebay for about 50 dollars. You can also buy them from a bearing supplier as they are std parts. But do buy decent ones, and avoid cheap chinese bearings. Note that all models of smart drive ever built use the same bearings and seals. And of the units ive seen the shafts are also indentical, regardless of machine size or year.
Control board
While i have never personally had one fail, there are lots of people who have had the electronics module burn out. I beleive this is either a consequence of a failure elsewhere in the machine, especially the pump, rotor position sensor and the like, such that the drive circuitry draws elevated power and blows the mosfets. The other cause especially in the earlier phase 1 models was water ingress into the top deck. Sealing in that area was improved for phase 2 and beyond. The solution here is simple: replace the control board. You can find these cheap enough from either the recycled parts market, or at the scrap metal dealers. If you know a thing or two, replacing the mosfets is also possible, and you can see youtube for help there.
2015-11-09
www.zoneblue.nz/cms/page.php?view=fisher-and-paykel-washing-machines


