Bosch GTS10J Review
For a portable table saw, deciding between the Dewalt DW745 and the Bosch GTS10J, i had pretty much settled on the Dewalt, based on an internet consensus that it is better engineered. In particular there are numerous reports of arbor wobble on the Bosch. The other thing that was holding me up was the short table on the Dewalt. Few people seem to notice this, but considering that the primary use of a jobsite saw is ripping, this was a factor.
Eventually, though, i got a good discount on a Bosch with a damaged box. As you do. And so this writeup refers to the metric version of the Bosch sold throughout Australasia. Note that in some markets the Dewalt is sold as DWE7480, and the Bosch as GTS1031. The Bosch P/Ns are 3601M30540 (240V AU), 3601M30510 (110V US).
But for the record here's a quick summary of what my research turned up:
|
. |
DW745 |
GTS10J |
|
fence |
rack and pinion well liked |
secured both ends |
|
arbor stability |
rock solid |
reports of wobble |
|
mitre slots |
std 3/4" |
16mm t-slot |
|
table |
decidedly unflat |
100mm longer |
|
arbor |
5/8", no dado |
1" or 30mm |
|
motor |
no soft start |
soft start |
|
chassis |
lighter |
frame runs full width |
|
storage |
overall smaller |
can be stored on side, fence storage |
|
price |
$999 |
$999 |
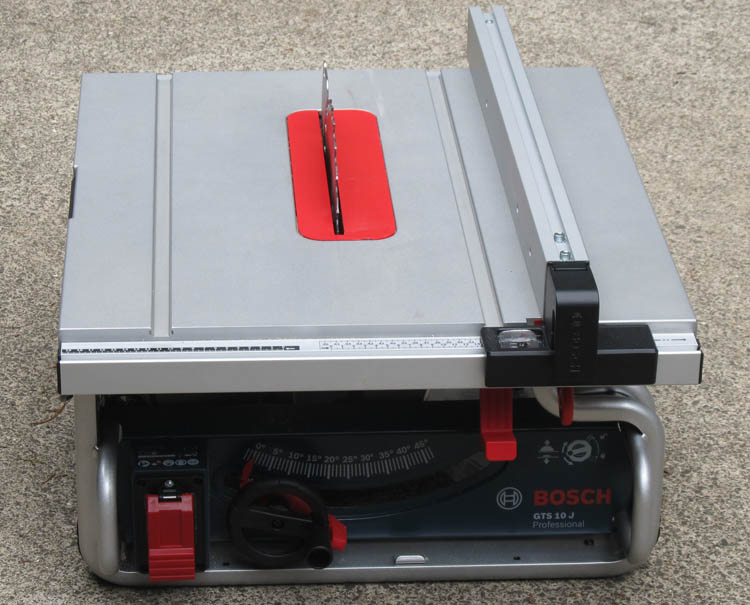
This writeup includes a brief overview of the saw, then discusses the arbor flange peculiarities and the saw alignment process.
The manual is approximately useless, so you may as well leave it in the box. The translation is not atrocious but not great either, but my major gripes with it are the separation of the images from the text, and the illogical and incomplete instructions for saw alignment. Anyway, everything is self explanatory if you know your way around a saw.
Table and chassis
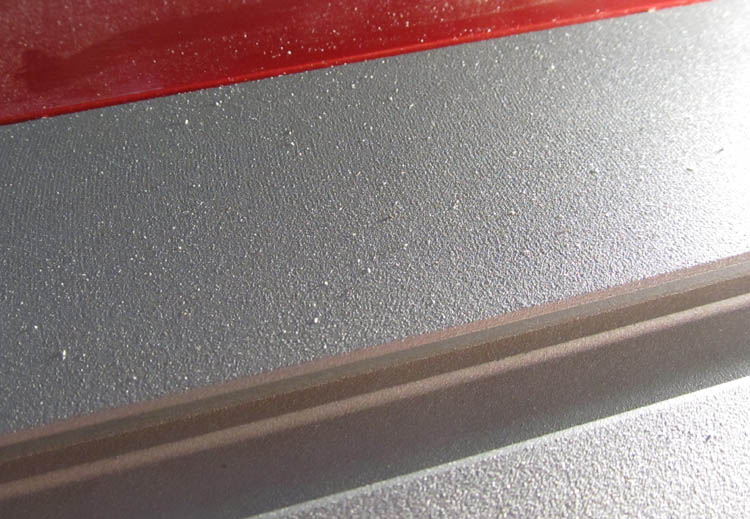
Close up of table surface. How did they get that casting so flat?
The actual table dimensions are 641mm long, 463mm wide, with the extension adding an additional 108mm to the width. The main table is cast aluminium, and the extension is folded sheet steel, but they are reasonably well integrated all things considered. The main table seems generally flat (surprisingly so), and sturdy, with the exception of a soft spot to the immediate left of the blade, which gives a bit if you push on it. Interestingly there are some visible machining marks, but those are probably from the mould. The coating has a sort of gritty textured finish, whose purpose is, I assume, to prevent fingerprints in the showroom.
The GTS10J breaks with tradition and uses 16mm mitre gauge T slots, which is perhaps a pity from a home-made jig perspective. While the chassis looks like aluminium tubing, it is actually pressed and painted sheet steel. I like that the chassis runs full width, and this along with the few extra kilos, makes it look and feel solid. Which is after all something you need in a saw. This design also allows you to stand the saw on either end, which is just awesome. And it seems like they really went wild with the on-board storage. The only thing i couldnt find was somewhere to clip the actual plug end of the power cord, which always seems to start a process of unravelling.
The throat plate is cast aluminium, and has no major give, unlike cheaper saws. Its securing system is a tongue on the rear, and a good stiff spring clip on the front. To remove it takes a flat blade screwdriver, and grinding a slight bevel on the underside of the slot will help with that. There are 4 grub screws for levelling, and apart from the shallowness of the mounting indents i have no other complaints. The shallow indents that the plate rest on pretty much preclude the use of wooden throat plates, because youll have to machine so much of the wood thickness away that it will become too weak.
Arbor and blades
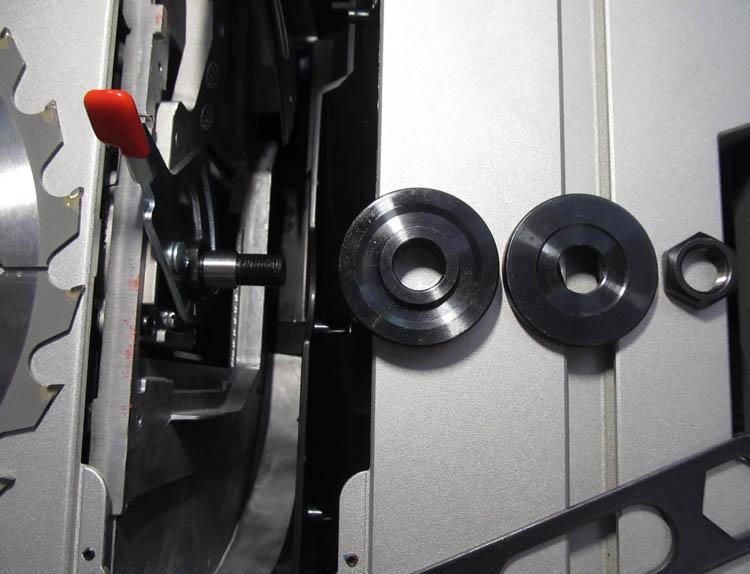
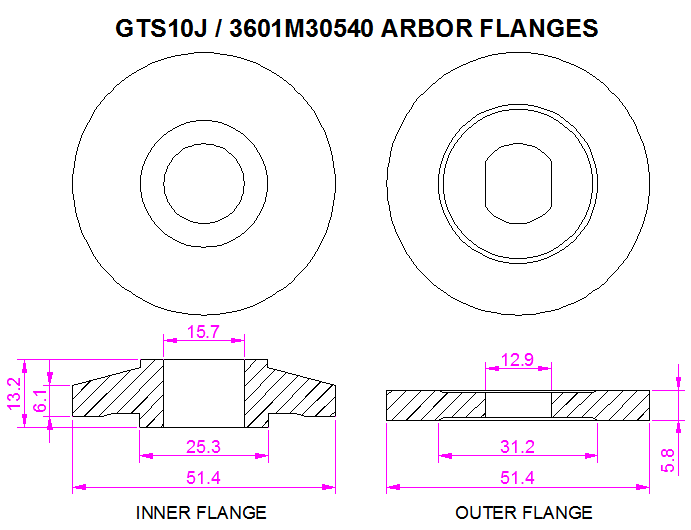
Arbor arrangement: 5/8" spindle flanged to 25.4mm blade bore
There is a lot of confusion about the arbor size of these saws. What is clear is that the motor spindle is 5/8" diameter on all variants of the saw. On the GTS10J models, the first half inch is a nicely machined circular shaft, followed by a short "double D" section for the outer flange to key to, and then followed by the threaded section. This particular unit, however, shipped with a pair of flanges to fit 1" bore blades. The inner flange has a 5/8" circular hole, and the outer flange has a double D keyed hole. See a drawing for details. One inch bore is inconvenient, firstly because most 10" blades sold here are 30mm bore, and the excellent Freud/Diablo blades that you can get from the USA are all 5/8" bore. So you are left with either locating 1" blades, using a 30mm to 25.4mm reducer (nasty), or... sourcing/fabricating a set of flanges for 5/8" blades. Sorry, but that's how it is.
5/8" Blades: a little research shows that the US version ships with quite a different arrangement. The entire spindle and the inner flange has the double D shape, whereas the Pacific/Euro version has the outer flange with the double D key. Here's the parts diagram for the US version, here and pictured here. So these flanges are incompatible with the gts10j. Upon reflection i think the best solution to using 5/8" blades in the gst10j is to get a second inner AU flange, and machine the collar off. NZD17+gst, according to the bosch website, but when i enquired that part has to sourced from overseas and i was quoted 40+ bucks, and 5+ weeks. In the end i ordered them from the super helpful spanish parts distributor on ebay.
30mm Blades: Further to the above, it transpires that more recent versions of this saw and the saw as its sold in most non US markets ship with arbor flanges with a 30mm bore. (See picture here). To quote an old friend "is nothing ever simple?" And... not only are there 1"/25.4mm bore blades but there are also 25.0mm bore blades, which are not interchangeable. So this saw as supplied in AU/NZ has a few traps for the unwary. Although you wont find anything other then 30mm bore blades at the hardware stores, if you go to a woodworking outfit, they can get NZ made Linbide brand 10" blades in any bore size. As a side note i see that Bosch now sell a rebranded Diablo blade here for around NZD199, and... a 30mm bore. You can get the same blade from ebay delivered via youshop for NZD60 all up, with a 5/8" bore.
The saw is fitted with an arbor lock, and a very basic pressed steel (sharp, bendy) spanner is included underneath the pushstick.
Fortunately on this unit there is no discernible arbor radial or end play per se. But if you grab a hold of the motor there is definitely some movement, which I'd say looks to be a product of either the alloy casting that supports the saw, or the trunnions themselves. We will see how this effects things later on.
As for the flanges they arent the flattest things in the whole world with about 0.02mm variance. With the supplied blade, I get 0.05mm overall blade lateral wobble, and 0.08mm radial wobble. Its a contractor grade saw I guess. I'll take another look at it when the Diablos and new flanges arrive.
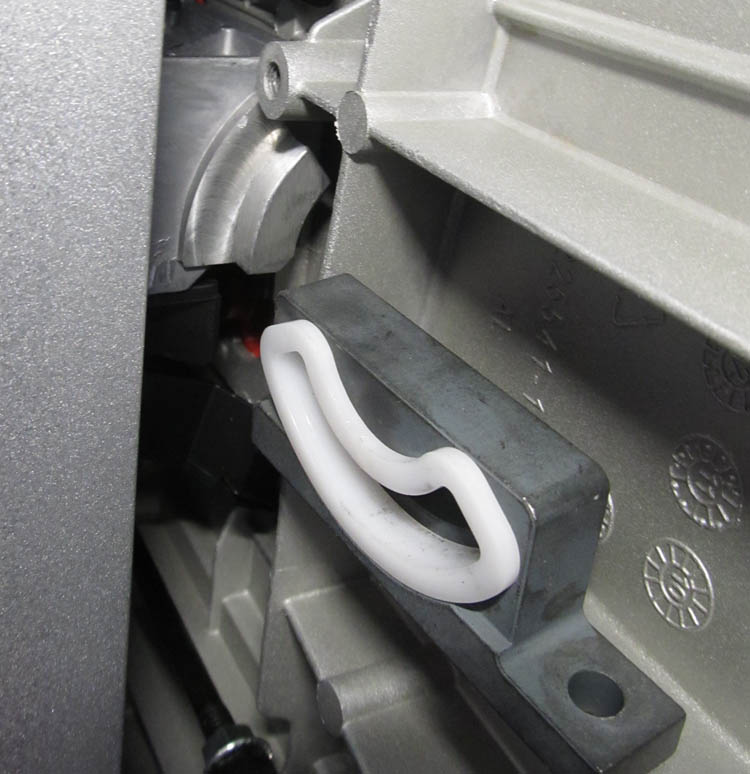
Riving knife
The design of the riving knife allows you to change the knife between full height to just below the blade height without tools. You just grab it and pull, with sprung ball bearing detents. However i can see no obvious way to completely remove it easily. Given the fuss of aligning this, if you needed to remove it that leaves the large hex head on the other side. There is a cluster of hex head screws and grub screws that secure and locate the riving knife. It doesnt feel like a super sturdy arrangement (Edit: it isnt), but does allow a good range of adjustment.
Tilt and raise mechanism
The blade tilt mechanism is the kind where the blade and motor swing free, not the wheel kind that many prefer. The saw raises smoothly in 24 turns. My grizzles there are that the tilt lock lever protrudes into the space where you can readily bump it with your knuckles as you raise the blade. And the levers are plastic and feel kind of bendy. The pair of cogs that raise the saw also appear to be plastic. The blue front panel of the saw is sheet steel, and the tilt stop cams are also solidly constructed in steel plate.
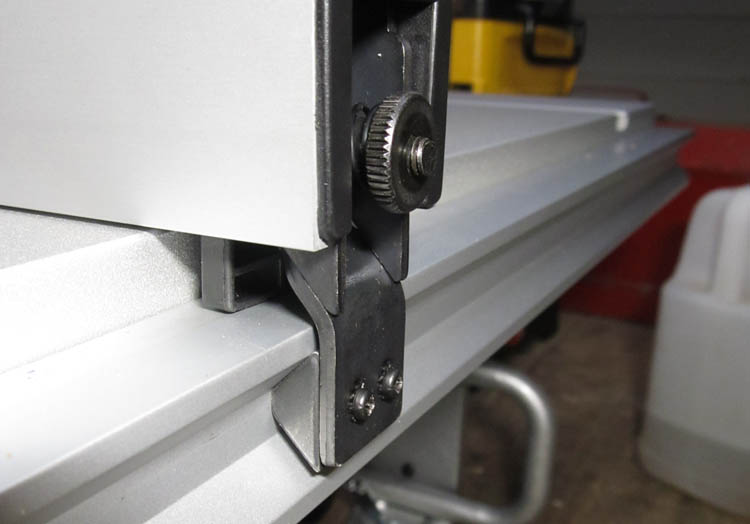
Fence design
The fence uses the same general principle found in bigger saws. Its secured to rails at both ends using a tie rod that runs inside the fence. Once locked its quite secure, probably more so than any other jobsite saw that Ive come across.
Disconcertingly, though it is not impossible to lock the fence out of parallel. However, with a little care, you can set it true repeatably enough by pushing the T part onto the rail before locking it.
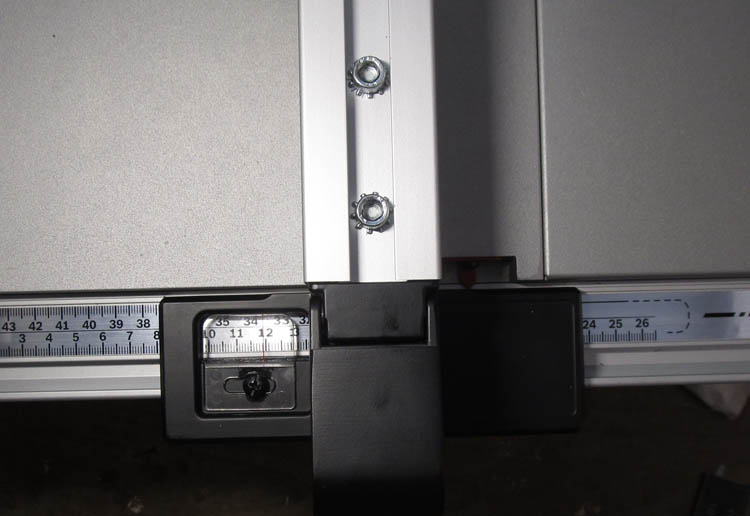
The fence rails telescope to provide a small extension table to the right of the saw. Really the purpose of the extension is to support the material at the fence, in the same way that Dewalt's flip down widget does. When the extension is closed, you use the main position indicator with the lower scale, and when the extension is opened the secondary upper indicator and upper scale.
And another odd thing, is that the way you are supposed to use the extension results in the fence overhanging the rail. The manual says to lock the fence at the 26cm position using the main indicator, then slide the extension to your rip width according to the secondary indicator. However the 26cm position results in a significant portion of the T overhanging the rail, which i suspect is a product of the "max rip width" wars. Ill have to see in practice how i end up using that, if at all. Parallel is everything when it comes to ripping safely, and compromises like these make no sense.
The rail, and rail extension extrusions seem sturdy, but there is some play between the two, and this causes some sag in the fence at full extension.
I have two pet peeves about the fence position indicators. The first is that the fence scale is in cm. Given that the entire building industry around these parts use mm as standard this is quite unfortunate. Second, the reading window has a large amount of parallax, which is just a noob engineer mistake that could easily have been avoided.
You have to admit though that the under rail fence storage is pretty neat.
GTS1031 Differences: turns out there's more than a few differences between the US version and this one. We've discussed the higher RPM no soft start motor, 5/8" arbor, and 3/4" mitre slots. But it turns out that the table length/depth on the GTS1031 is shorter, the same 22" as the Dewalt. There is also no arbor lock, the throat plate has a finger hole, and hardened areas for the supplied kickback pawls, both absent on the GTS10J. The throat plate also comes with a wider dado compatible slot, and the blade guard is in two pieces instead of one. Interesting.
Saw Alignment
I dont know about the average guy, but out of the box, to my mind this saw was far from well aligned, so be prepared to invest a good couple of hours before you even turn it on. Forget what the manual says, the sequence that i did this is:
1. throat plate
2. blade tilt 90 degree stop
3. blade parallel to mitre gauge slot
4. riving knife
5. fence parallel to mitre gauge slot
6. fence indicators
My check, with as good a set of instruments as I could lay my hands on, showed the table to be very near flat, square, and the two mitre slots straight and parallel to each other.
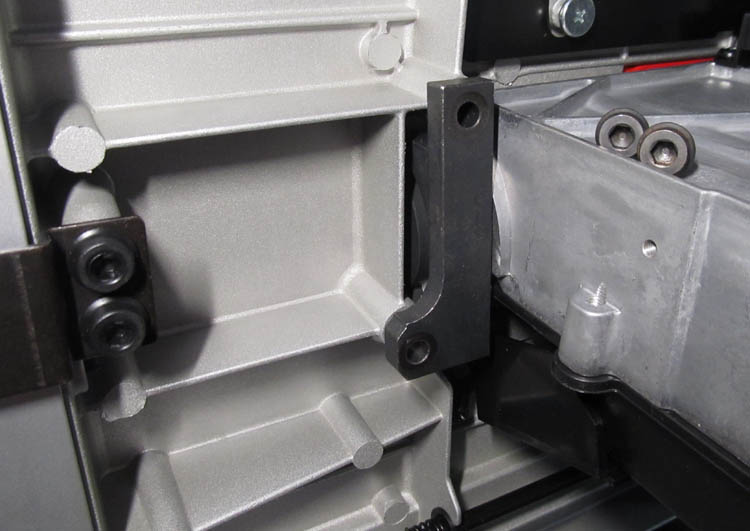
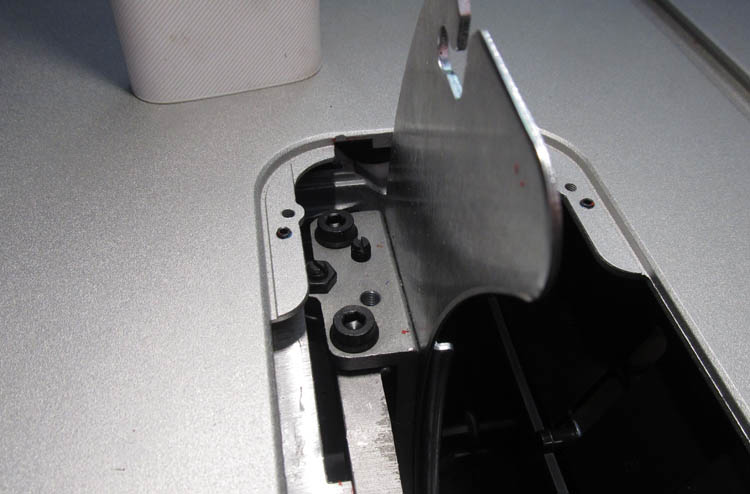
But most noticeably the blade was a good half mm out of parallel with the mitre gauge slots. Fixing this would normally require you to loosen the two sets of two allen/hex head screws holding the trunnions in place. Do this with the table right way up, realign it, then reach under and tighten them. However, in common with what others have reported, the saw had insufficient play in the trunnion block mounting screws (about 0.25mm), and i had to disassemble the trunnions in order to file a bit of an ovoid in the holes in the trunnion blocks. In order to remove the trunnions, you need to loosen the two phillips screws (that they still use phillips in this day and age is incredible) that hold the lower saw height gear shaft, see the saw tilt cam image. With those screws loose, the motor assembly can slide a little to either side, allowing you to (only just) remove the trunnions one at a time. They seem nicely cast, solid, with a nylon insert that is snug, but perhaps could be shimmed a bit tighter.
|
Trunnion / mounting bracket with screws removed |
Trunnion / mounting bracket removed |
As a general rule when you test the alignment, you want to use the same tooth as a reference. This is to take the arbor, flange, and blade wobble out of the equation. The blade in the box was as is to be expected a cheap 24 tooth Bosch branded blade, that cuts rough, and about as flat as any other stamped blade. To measure the parallel you can use a dial indicator or vernier callipers. After reassembling everything, the blade was near 0.03mm parallel, and i called that good. I'll have another go after the saw settles in.
For the blade tilt stops, the 90 degree cam was made out of tolerance, and wouldnt actually permit the saw to reach true 90 degrees. I had to file about a millimetre off the small end of the cam to get the blade vertical. Kind of incredible but easy enough to fix.
The two screws to loosen to remove the trunnions. Also the 90 degree stop cam, helpfully hidden behind the power cord.
For the riving knife, there's nothing in the manual about adjusting this, but out of the box it was not well aligned, in fact visibly so. There is a cluster of hex head and grub screws that are used to align the knife with the blade. The mounting bracket tilts on a raised part of the motor frame casting in line with the grub screw and the missing grub screw. One assumes that that grub screw is used to tilt the knife in the forward and backward plane, but it seemed to me to further destabilise what is already a pretty wobbly sort of mechanism, so i backed that off for now. The process of getting the knife vertical is a tad fiddly, of progressively loosening and tightening the outer grub screw (with the lock nut) and the two hex heads. Id like to see a grub screw that controls the lateral position. At some point i guess i'll shim under those hex heads to make this more bullet proof.
For the fence alignment, again, there's nothing in the manual about this, and again, out of the box the fence on my unit was about a half mm out of parallel with the mitre gauge slots. If we were being generous it could have been the same half mm the blade was off the mitre slots... but i doubt it.
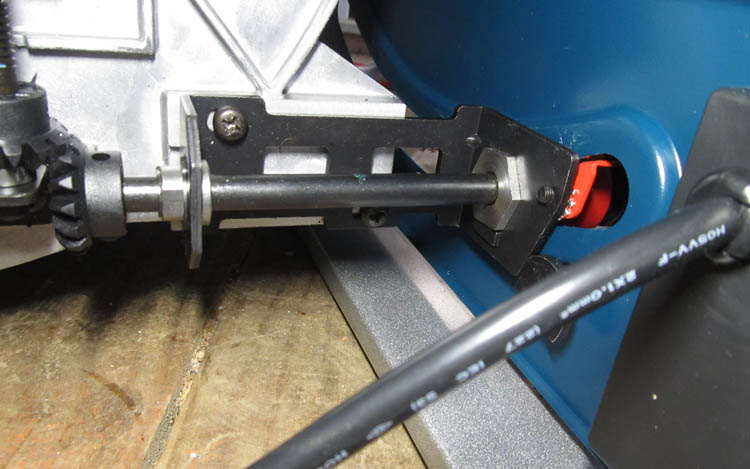
The T part of the fence is cast aluminium or possibly die cast zinc, and all that attaches it to the fence extrusion is a relatively slender tongue, which is secured using the two hex heads and toothed washers, visible on top of the fence. There is a small amount of play in the bolt holes, and after you figure out that you need to first debed the lock washers (otherwise it just returns to its prior position), you can reposition the extrusion relative to the T casting, and retorque. Dont overdo the torque, if its pot metal, it will strip. easy.
There is a tension knob on the back end of the fence that controls how tight the back end grips the rear rail. This arrived loose, which could be a bit of a trap for those expecting the saw to work out of the box. Lastly check the two fence position indicators. The main one with the clear plastic indicates fence to blade distance on the lower right scale when the extension table is closed. Set the clear indicator to zero up against the blade, and the secondary indicator to 26cm when closed.
|
The two screws that control fence squareness |
Rear fence tensioner |
Conclusion
To realize the saws potential means resolving the flange issue. Will i regret not getting the Dewalt? Not sure, my Dewalt thicknesser has a well resolved design and has never let me down. But one thing is certain, neither the GTS10J or the DW745 are cabinet makers saws. However I have done a couple projects with a 60 tooth linbide blade, and while the saw seems well enough tuned overall, that blade is no comparison to the Diablos.
A couple of comments on the saw from practice. First the blade guard's internal storage interferes with the blade tilt. You can have one or the other. Thunk...(blade guard hitting the bottom of the rubbish bin). Second, both table and especially the throat plate paint comes off from the outset, and your work pieces get lovely red streaks (poor priming and/or paint). Third, cross cutting with these saws with narrow tables is, as we know, sub-optimum, there not being enough table to the left (or front) of the blade. You end up using the right side table extension, which for righties, is all arm tangle. Forth, when making a sled to replace the crappy (beyond all imagination) supplied mitre gauge, the T slot has a small bearing surface and i suggest using aluminium for the runners. And lastly, the left side saw stowage is really really awesome, with two caveats. First the power cord is on the left and the handle is on the right. So this forces you to tidy the cable away neatly each time. Instead thread the cable out the right side. Secondly, more than one reviewer commented about how well the lifting handle captures the saws centre of gravity. Well, for the US model that is as maybe, but for the units with the longer table, its now off balance. And that there is the beauty of last minute design changes, a lesson we can all learn from.
Heres a couple of other saw comparisons for reference:
http://www.aconcordcarpenter.com/dewalt-vs-bosch-compact-table-saw-comparison.html
http://www.thisiscarpentry.com/2012/01/20/portable-saws-bosch-or-dewalt/
http://www.pressureforever.com/dewalt-dw745-vs-bosch-gts1031-table-saw/
Update: OK, so the new flanges finally arrived and as this writeup is quite long enough, Ill deal with those and some other saw modifications on a separate saw mods page
2019-08-31
www.zoneblue.nz/cms/page.php?view=bosch-gts10j-review


