Living area
The plans for this stage are:
Office/sitting area
- make desk in 33mm E.Saligna
- make seating and drawers below in Sycamore.
Kitchen
- solid wood bench, cabinets
- sink insert and cooker
- find home for gas bottle
Electrics
- start lighting
Starboard mid section
April came and went as a result of dental hassles, work and and other related distractions, and the only thing achieved was making curtains. The fabric is the same tealy blue as the bus exterior.

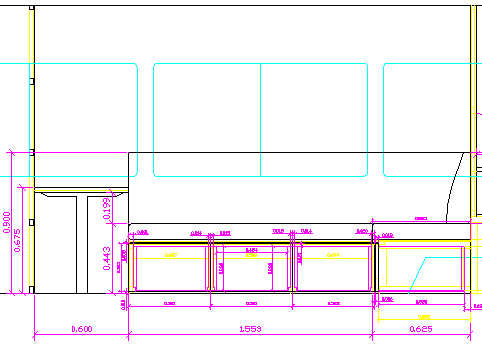
During May I made the `office` desk. Its 19mm australian blue gum, with edging added below to bring the overall thickness to 33mm. Fixed to both sidewalls and a T shaped leg supports the free end. Three grits to 180, and three coats of Tung oil to finish. The table is 1000 x 600mm and 675mm high. Its low primarily for keyboard work.
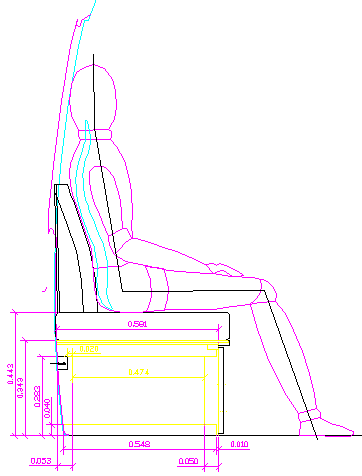
Then the seating. After sitting in heaps of campers, and a bit of a trawl through the ergonomics literature, i finalised the drawings.
What i noticed in my `bumbs on` research was that a seat that was as deep as my forearm and the same for back height felt about right. In my case that would be 500mm. However space constraints meant compromise and a reduction down to 460mm. BTW I also expect to add extra padding under the thigh to stop you sliding off the seat.

The seat`s structure is two thicknesses of hardwood ply on a reasonably light pine/sycamore frame. Its 625mm deep by about 2.2 long. The main anchor is a 45x35mm pine rail which runs the full length and bolted to the buses original seat attachment points. I managed to get the cabinet very square, despite the floor level doing something of a crest forward of the rear wheel arch.

Primary storage beneath the seating is the 4 drawers, 500x300x550mm.
I love drawers and especially in moving houses. OTOH i detest those kind of hatches you often see under the foam.
The drawers were an exercise for a rainy day or 7 to be exact, and are designed to fit the allotted space very suggly indeed to maximise storage space. However note that you should allow a minimum clearance of 15 mm between the top of the drawer sides and the cabinet top rail, to allow drawer insertion! Ooops.

Ahem, OK in the corner it was unavoidable.

By rebating the drawer slides there is only 4mm drawer clearance all round. Bit extra underneath to allow for drawer sag, and floor furnishings. False fronts were avoided by dowelling the drawer fronts in place. See the ever so nice sheen the sycamore finishes to.
The seating will be finsihed in 100mm latex foam. Theres a place in town thats cuts it to size. Great stuff latex, and not that expensive either considering it lasts forever.
Port mid section
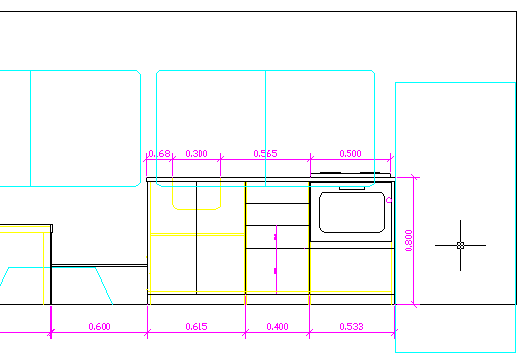
Next on the agenda is the kitchen area. Mocking it up as i did the office area, in scrap wood gave me, and my resident design advisor, a much better idea of proportions.

Working in CAD is one thing, but you have to actually feel the results in person. It feels about right at 457mm deep, but could almost go down to 440mm maybe. Depends completely on appliances. Width is the critical dimension here and there is simply no point in a 600mm deep benchtop in 14m2 home.

Common with most other Coaster conversions therell be a bit of a wrestle with the battery hatch, although in this case we are going way narrower. The usual solution is to rebuild the hatch in ply and making a false bottom in the pot drawer beneath the oven area. The batterys will remain accessible ...just.
For now then its back to glue laminating the poplar cabinetry, 30mins a day. 7 days a week. This is my new slow and steady, thousand cuts approach, superior in every way to weekend only work.
misc

Sidewall detail. The skin floats on sprung clips.

Stuff just in fron of the side door.
Door closer, `preheating timer` (whats that?) , and second fusebox, (heating/aircon)

OEM ceiling lining. Added insulation, strength, and low weight. Held in place by its own bow. Japanese engineering.
2008-10-25
www.zoneblue.nz/cms/page.php?view=living-area


